Showing posts with label Home-made. Show all posts

Sunday, October 16, 2011

Healthy toasted coconut muesli

Has it been almost a month? I apologise for disappearing, life has just been a bit crazy, although i won't go into detail.. i will try harder to post more often :)

Inspired by Maria's sugar-free coconut granola, i went out to buy some coconut flakes and made my own version.

What i love about Maria's food blog is not only her photo's (which are always gorgeous) but all her recipes are healthy and good for you, i know she is a bit of a health nut so i have courage in trying her recipes and sharing with my friends who are also health conscious.

What i found about this recipe was that with my oven, it required about 4 times of turning before it got to the colour that i wanted, so you could even turn it once every 15 minutes and you would be safe, it won't burn!

I made 2 batches, one for my lovely couple friend Ann & Chris, (Chris i know likes granola/toasted muesli) and Stella, my girlfriend who cannot eat gluten and so i omitted the quickoats, and so i hope they all like this!


Healthy toasted coconut muesli

1 cup quick oats
125grams coconut flakes
50grams almonds (unroasted)
30grams chia seeds
30grams pepitas
30grams sunflower seeds
35grams coconut oil
1 teaspoon cinnamon

(serve with any type of milk that you like)


1. pre-heat oven to 140 C (lower to 120 C if you have a fan forced oven)

2. mix everything together and spread onto a baking tray lined with paper

3. bake and watch it at either 10 or 15 mins and turn batch over with a spatula, and put back into the oven, keep doing this until you get the colour that you want.


* * *


I was a bit bored, so i calculated the kilojoule count and ended up with:

including quick oats 1870kj/100gram serving
without quickoats 1570kj/100gram serving

So even though it is quite high, and a bit higher when you add milk, you will know that your mix has no preservatives, extra sugars, or anything nasty as you have made it all yourself :)

Sunday, May 1, 2011

Taro in coconut cream - and an introduction to my new health & fitness blog!

I'd like to introduce you to a new blog that my friend Stella and i have started together. The idea was sparked after attending the fitness expo a couple of weeks ago, where we both realised we need to really take care of our body and health, both of us keen gym and exercise goers, the other part that we needed to look at was our diet and lifestyle!

So together we've started this blog, in hope to share our information and stories about health, life, a bit of love, all positive aspects of anything we can share with the world.

If you have a moment, come and check it out :O)


A recent post is about the health benefits of switching to coconut sugar. And the following is a recipe that uses coconut sugar, so so good, i'm totally addicted to it right now!

Stella introduced me to this delicious dessert of boiled taro in coconut milk with a sprinkle of coconut sugar. It is nutritional, very filling, and good for you in so many ways! I also have this for breakfast as well as it keeps me full for ages!

All you need to do is peel and cube a piece of taro (depending how much you want to have, and how many people you are serving


Boil until cooked all the way through and looks mushy

Drain, and pour over coconut cream (or coconut milk, whatever your preference is)


Sprinkle with coconut sugar!

In my previous post I've talked about how coconut sugar is good for you, well now i will tell you why taro and coconut cream are good for you too :O)


Coconut cream is not as bad as people think it is. Yes it's got a high fat content but it is a good high saturated fat that benefits your health and weightloss very easily by converting to energy as soon as your body absorbs it, just like carbs. In other words, it doesn't transform into bad cholesterol which clogs up your arteries and triggers heart problems and stroke. Most importantly, it doesn't cause weight gain as easily as what most people think.

But of course, everything in moderation! If you have too much coconut cream, yes it'll turn into a negative benefit (if that makes sense) So it's alright to consume in moderation in order to reap its health benefits without getting its disadvantages.

& Taro, is a meal in itself! These babies keep you full for so long, so in that sense is good for weightloss. But again, IN MODERATION! The scales can go the other way if you're not careful about that.

Taro has many nutrients such as fiber, potassium, iron, calcium, vitamin A, vitamin b, vitamin B2, and vitamin C.


Thursday, November 11, 2010

Sushi-Bowl


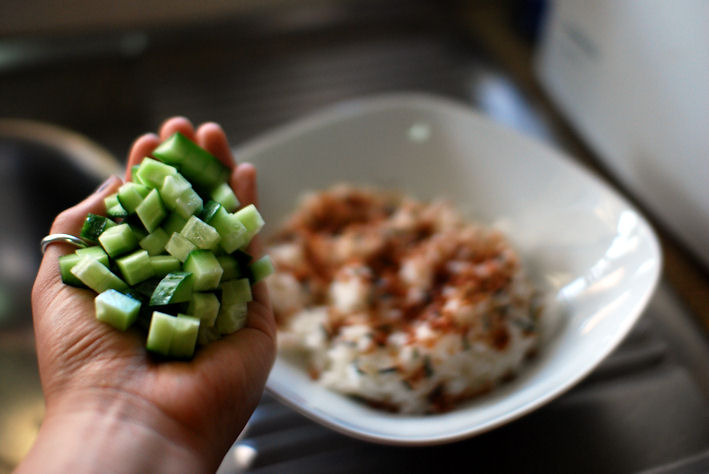
My cousin Joanne recently bought me some packet bonito flakes to try out - a mixture of sesame seeds, seaweed, bonito flakes & seasoning, it's a delightful crunchy addition to any plain old boring bowl of rice.

Actually it might not be bonito, i can't read Korean? If anybody can translate it for me that'd be great :O)

step 1 : rice


step 2 : sprinkling of packet mixture

step 3 : add chopped cucumber (or avocado) (or both)

step 4 : tuna

step 5 : cut up sushi paper & kewpie mayonnaise


step 6 : enjoy!


Another idea is to mix the bonito flakes through a small bowl of rice, and shape into onigiri like below ^_^

photo courtesy Joanne @ http://mojojo-jo.tumblr.com/

Thursday, August 26, 2010

Baked not Fried Polenta chips with Aoli


I had never worked with polenta before, it's just something i was never intrested in making. Until i found this post while browsing the internet. A healthy alternative to potato chips, i had to try it. I actually tried to deep fry them but, they all just stuck to the bottom of the pan, broke into small pieces, and weren't very appetizing :(


But into the oven they went, and they turned into lovely golden crunchy yummy morsels, and guilt free snacking! & i love aoli sauce, could not go past dipping them into some!

Polenta chips

2 cups organic milk
2 cups water
1 1/2 cups polenta (see above)
1 teaspoon fine grain sea salt
1/2 cup grated Parmesan cheese
1/4 cup melted clarified butter or olive oil

Bring the milk and water just to a boil in a large saucepan. Slowly stream in the polenta while stirring constantly. Stir in the salt and turn down the heat a bit if needed (you don't want the polenta to scorch). Continue stirring until the polenta thickens up (see picture), this can take anywhere from just a few minutes to much longer depending on your polenta. Stir in the cheese.

Remove from heat and spread out 1/2-inch thick onto a baking sheet using a spatula (although I feel like I get a better shape by letting it cool a minute or two and then using my hands). Chill in a refrigerator for at least an hour, or overnight. Cut into wide-cut "fry" shapes using a straight-edge for guidance and uniformity (or opt for a more rustic cut). Rub each fry with a bit of clarified butter or olive oil and sprinkle with some salt.

Bake in a 450 degree oven, middle rack, for 20 minutes or until golden and crispy. Flip the fries once after ten minutes.


Quick Aoli

2T Mayo [or more depending on how much you need]
1t of fresh squeezed lemon [up to one whole lemon, if necessary]
1 - 2 crushed garlic cloves [add as many as you like for taste]
pinch of salt

How to make it:

Mix all ingredients together. You can add more of any of the ingredients....it's up to you and how you want it to taste!

Thursday, March 11, 2010

Home-made Chai Syrup

I am a huge fan of chai, and till now i have only used the powder version by arcadia which i discovered at the Good Food & Wine show 2009. I dont trust any cafes to make any drinkable chai lattes (except for Badde Manors in Glebe).

When i came across this link i just knew i had to try it, and it was so simple to set up. After buying a few small containers of spices from Woolworths (i already had condensed milk in the pantry) i excitedly put it altogether & chucked it in the fridge.

The next day i brewed a cup of black tea (i used Dilmah) & added four heaped teaspoons (not the recommended 2, i have a major sweet tooth!)


The result? - a sweet yummy spiced cup of chai drink that was beautiful to sip on, and later on refridgerated becomes a refreshing afternoon pick me up! So here is the recipe, i hope you can try it out- and let me know what you think :O)

Chai Concentrate Syrup


1 can (400ml /14oz) sweetened condensed milk
1 tsp ground cardamom
1/2 tsp cinnamon
1/2 tsp ground cloves
1/4 tsp ground ginger
pinch of freshly ground black pepper

In a plastic container mix together the sweetened condensed milk and the spices until everything is well combined. Cover and store in the fridge overnight.

To use, brew a cup of black tea as usual (or an English Breakfast) and add syrup to taste: two teaspoons for a slightly sweet and spicy cup, or a tablespoon or more for sweeter, milkier tea. If your spices are coarsely ground you can add the syrup directly to a teapot and pour the tea through a small strainer.

note- i accidentally bought whole cloves - oops! I wont name any names but - its all YOUR fault (you know who you are)

Tuesday, March 2, 2010

Red pesto with fettacine with chilli garlic scallops

The first time i ever had my own jar of pesto, was when i went to the 2009 good food & wine show, and got a free showbag full of goodies. Lots of samples of food like pasta sauce, honey packets, rice, drinks and snacks of all sorts, there was a jar of red pesto. I had no idea pesto came in red (i always assumed it was the green stuff) and i had never tried it before.

I was visiting a friend after the show, going through all the goodies i had bought on the day, and realised i was really hungry, so he brought me a bowl of rice and i was curious to try the pesto ..

Yeah, a few people think its a bit odd that i had pesto sauce with rice, but it was seriously addicted & yummy! AFter that, i had a bit of an obsession and had it atleast 3 times a week.. with chopped cucumber, tomato, whatever fresh veggies i had in the fridge.

I did however get sick of this.. (its a vicious cycle of addiction and then having it to much i cant stand it anymore, it's happened with quite a few foods..). For about 6 mths i didnt have any pesto, until i came across this link, and i wanted to try it out.

Oh & yup i'm no longer fully vegetarian, i eat scallops and oysters because they have no face, so technically speaking, i'm a pesketarian again.


This is my preferred brand for tomato pesto, i've tried other brands but.. this one is the creamiest and most flavoursome one.


All i did was (sorry this isnt a proper recipe but i did sorta just make it up based on what ingredients i had at home)

some garlic
some olive oil
some scallops

make sure the oil is well heated (otherwise the scallops will release a lot of water)
and pan fry the garlic until fragrant, then add the scallops

so with scallops, to get that stripy grilled effect you need a cast iron griddle thing which i didn't have, and a really high heat stove. Mine wasn't heating it enough so i ended up draining the scallops of all the water that came out of them..

after, you get some pasta from the cold section at the shops, this is the fresh packet pasta that is already cooked so it doesn't take long to cook in boiling water, only about 5 minutes or so.

When that's done, stir through pesto (which is better if you preheat in a pan first), top with scallops, decorate with halved cherry tomatoes, and sprinkle with grated parmesan.

A fairly quick meal to get together, i found it a lil dry though, possibly because... i'm not sure. Its definitely not the creamiest pasta i've had, but the pesto is really strong so maybe extra pieces of avocado would help!

Friday, October 16, 2009

Indulge your senses Pure Chai


So, bettysbites was sent a *first* product for reviewing from Rachel of Polarity Consultants. I was really excited to see an email in my inbox with "Product review request - Indulge Your Senses Pure Chai" & eagerly read on, replied, & shortly after - received a package in the post!

I'm a huge lover of chai, i don't drink coffee so chai is the next best hot drink for me.

Now i straight away made some for my boss & my workmates & ofcourse myself. I had received two canisters one of chocolate chai and the other vanilla and honey chai.

The results? Naveed loved it, and asked where he could buy some. Rahul, asked if he could start a food blog - would be get offered product reviews too? Hehe. & my boss, said it was to sweet for him (i should of thought twice before offering, as he only takes half a teaspoon of sugar in his coffee (and this drink requires atleast 2 teaspoons of powder to be stirred through)

I made two cups for myself (so naughty i know) and i preferred the vanilla honey over the chocolate, only because i felt like i was drinking chai more with the honey & vanilla flavouring, and the drink being a lighter colour.

When made with skim milk, these drinks are 99% free - no guilt included! Yet the flavours are so intense, something i won't feel guilty about indulging in every morning tea time.

Now, onto the icecream.. I was browsing blogs & came across Shez's 3 ingredient-no icecream maker needed- icecream, where she too had also been offered the same products.

I had always thought that icecream took a long time to make, and quicker with an icecream machine. So after reading her post, i most definitely had to try it out, All i needed to do was stop by the shops after work and buy a tub of thickened cream..

all you need is:

600ml thickened cream
1 can (375ml) condensed milk
2-3 heaped tablespoons of chai powder (i used chocolate)

Put all the ingredients into a bowl, and beat until the mixture doubles in size. Pack into containers & freeze for atleast 4 hours before eating. This process can be quickened by stirring through at half time to even out the cold icecream.

I have one container especially marked for my best friend Ann - she's gonna love it!

Shez used 2 tablespoons, but i reeally love the flavour of chai, and i think the colours in mine turned out abit more darker aswell.

Richard was the first to try the icecream (after me hehe) and he said the icecream was premium tasting - better then anything he's ever tried. Now i'm not sure if he's just over complimenting, but it was pretty good :) & i loved the fact that i could just whip it up in the morning quickly, and it was ready when i got home from work!

Thursday, August 27, 2009

Mushroom & Leek Pot Pies


I first made these pies for Richard on his birthday in July, knowing Richard loves his mushrooms, and i've never made a pie before, i decided to give it a go. I actually bookmarked quite a few dishes from this book, & me being so indecisive, it took me a couple days to finally make up my mind hehe.

These pot pies are vegetarian, full of flavour (without too many additions of flavours), and are quite filling as well. It doesn;t have many ingredients, and is so simple to make! All i needed was four ramekins, which i got at Woolworths at about $2 each.

Ingredients (serves 4)
5 tablespoons olive oil
1 leek, sliced
1 garlic clove, crushed
1 kg large field mushrooms, roughly chopped
1 teaspoon chopped thyme
300ml pouring cream
1 sheet ready rolled puff pastry, thawed
1 egg yolk, beaten, to glaze

For the leek, this was my first time using i actually, and found this video online on how to prepare it. link here .

1. Preheat oven to 180 degrees

2. heat 1 tablespoon oil in a frying pan over medium heat. cook the leek & garlic until the leek is translucent & soft (about 5 minutes). transfer to a large saucepan.

3. heat remaining oil in frying pan over high heat & cook the mushrooms in 2 batches, stirring frequently. for 5-7 minutes per batch, or until mushrooms have released their juices and are soft & slightly colored. Transfer to the saucepan, then add thyme.

4. place saucepan over high heat & stir in the cream. Cook, stirring occasionally for 78 minutes, or until the cream has reduced to a thick sauce/gravy.

5. remove from heat, and season well with salt & pepper.

6. Divide the filling among four 315ml (1.1/4 cu) ramekins or oven proof bowls.

7. cut pastry into round slightly bigger than each dish.

8. brush rims of ramekins with a little of the egg yolk, place pastry on top & press down to seal. brush the top with remaining yolk.

9. place ramekins onto a metal tray. bake for 20-25 minutes, or until pastry has risen and is golden brown.

tips!
make sure you brush the rims with egg yolk, & press down! (not too hard though, you'll break the pastry)
if you don't do this, the mixture will boil & bubble out and drip down your ramekins (not very neat looking!)


the result: crispy pastry top, with an awesome mushroom filling & delicious gravy as well. bon a petite!

Dulce De Leche Brownies


After seeing a post long ago here, then recently here, i decided to bake my first batch of brownie with this recipe here (which actually came from here).

Dulce de leche in Spanish or Dolce de leite in Portugese is a milk based sauce made from either boiling a can of consdensed milk in a pot of water, or baking in the oven (this takes longer though).

I boiled my two cans in a pot of water for about 3 hours (about half way i totally forgot about them, and they almost boiled dry (and if they do, expect an explosion me thinks!). So just make sure you check it every half an hour, & top up with more water (cans need to be completely emerged in water).

I made these on a Friday night (i was watching the footy & making name placement cards, hence getting side tracked hehe) and i planned to make some brownies & cupcakes over that weekend, but just didn't have the time to. Ended up making my brownies on a Wednesday afternoon to bring to a mini foodie meet up! Everyone liked them, & i'm hugely proud of myself, but i've still yet to taste the *perfect* brownie, so i really can't compare mine to any besides the crappy dry one i bought from starbucks a while ago.

So here we go..

Ingredients
115 g salted or unsalted butter
200 g of any dark chocolate (i used cadbury's dark cooking chocolate)
1/4 cup cocoa powder
3 eggs
1 cup caster sugar
1 tablespoon vanilla essence
1 cup sifted self raising flour (i think i was meant to use normal flour here)
1 can dulce de leche

Line your 20cm cake pan with foil & lightly spray with some cooking oil.

Melt butter in a bowl over simmering water, then add roughly chopped chocolate, stir until melted, remove from the heat.

Whisk in one at a time the cocoa powder & eggs (one by one)

Stir in the sugar, vanilla then flour

Pour half the batter into your pan, place big spoon fulls of your dulce de leche into the batter (i did it 3 by 3)

Pour the rest of the batter over the top, then spoon the rest of your dulce de leche over the top.

Bake for about 40-45 minutes. I checked mine at about 34 minutes, and my chopstick came out still wet, so another 10 minutes did it for me.


Leave them to cool completely.

I actually couldn't wait so i tried them while they were half way cooling, and the dulce de leche was pretty hot haha!

I found mine cakey (probably cos they were still warm) but i had some the next day and they weren't bad!

Tuesday, August 11, 2009

My First Tea Party

After visiting a few high tea places, and seeing Trish host her own little one, inspired me to make a small celebration tea party for my 24th Birthday :)

Then thing that allures me to high tea is the cute & tiny servings of sandwiches, cakes & sweets, and sipping on tea & sparkling wine, it's all very fun to do while hanging with friends, & i like to bring together my closest friends for food/dinner/cupcakes, i love to host small get togethers at my place, & catch up on things :)

I prepared cupcakes one to two days in advanced, refrigerating them, and prepared the icing the night before/on the actual morning. This is because i was short on time.. if i was home on Saturday night then i would of done everything fresh, but seeing as i was out of the house alot, i had no choice (and i wasn't ready to miss out on sleep the night before the event hehe)

Over the next couple of weeks i'll be posting up recipes for the following cupcakes, snacks & hor'deourves, except the scones & banana babycakes as Trish brought them to the party!) 

I also made some sandwiches (it wasn't ALL sweet delights hehe).

- Chicken lettuce & aoili crustless finger sandwiches
- Cheese & Salami crustless finger sandwiches (no pictures of these, as they were covered with glad wrap, then disappeared really quickly after exposing them! hehe)

orange & poppyseed babycakes with orange juice icing


Mini custard tarts with strawberry glaze


Trish's banana babycakes with cream cheese frosting


Chai Chocolate babycakes with chocolate icing


scones (served with jam & cream)


white mud babycakes with rosewater icing


Smoked salmon & cream cheese toppables

mushroom & leek voleuvants 


The Gang :)


I originally planned to have everything outside in the back yard, but there was no sun, & lots of cold wind, so we moved everything indoors, which wasn't too bad we were all snuggled up close together in my living room :P

Saturday, June 20, 2009

Raspberry Muffins with Lemon Icing

I had brought a punnet of raspberries for a chai porridge recipe i had found in 'Womens Health', but the little things were mushy (i assumed they should be abit more firm? Like with blueberries i know they are good when you bite into them they have a slight crunch but if they are soft then they aren't as good..)

So since my workmate's wifes Birthday was coming up i looked for a cupcake recipe with raspberries. I looked through all my cupcakes books, but ended up finding this one on LemonPi's Website here.

& the icing i used one from '200 cakes and bakes' by Sara Lewis.

3 cups plain flour
3/4 cup caster sugar
3/4 cup light brown sugar
1 1/2 tablespoons baking powder
1 1/2 teaspoons salt
4 eggs
1 tablespoon pure vanilla extract
1 teaspoon freshly grated lemon zest
1 1/2 cups whole milk
8 tablespoons (113g) unsalted butter, melted and slightly cooled
2 cups whole raspberries
1/2 cup coarse raw sugar

Preheat oven to 190′C.

Sift flour, caster sugar, brown sugar, baking powder and salt into a medium bowl. Mix gently with a wooden spoon and set aside.

In a separate bowl, combine eggs, vanilla extract, lemon zest and milk, and mix with a whisk until combined. Add to the bowl of dry ingredients and stir with a wooden spoon just until all the dry ingredients are moistened. Slowly add melted butter and continue mixing until batter is smooth and there are no visible streaks of butter. Gently fold fruit into batter, taking care to avoid crushing the fruit.

Scoop batter into lined muffin tin, filling the cups to the top. Sprinkle coarse raw sugar on tops of muffins and bake on center rack of oven for 25 to 30 minutes. Finished muffins will be golden brown. Let cool at least 10 minutes before lifting each muffin from the pan.

Lemon Icing:

1 cup icing sugar & lemon juice. Double sift the icing sugar into a bowl & gradually mix in just enough lemon juice to make a thin spoonable icing. Drizzle icing from a spoon in random lines over the top. Leave to harden slightly before serving.


Let the muffins cool completely before icing them (in my case i didn't follow instructions & was abit of an eager beaver so it got a tiny bit messy!). 

These muffins were really delicious probably the nicest i've ever made & i LOVE the colors of the raspberry when you bite into it. The top part was nice too because it was extra sweet from the raw brown sugar.


Monday, June 15, 2009

Cream cheese & kiwi Tart

On a quiet, Thursday afternoon i tweeted ...

'My dad just brought home some Kiwi Fruits. What should i do with them?'

& @eece a.k.a Lis Enos replied with ...

'tarts!' & emailed me her recipe for 'Cream Cheese & Strawberry Tart'.

Off to the shops i bought a 12 pack of Pampas pre-made frozen tarts. I already had kiwi, apricot jam, thickened cream & Philadelphia at home.

Here is the recipe except i had double the amount of cream cheese therefor doubled everything else & was left over with about one cup of filling which i just threw away.

First I baked the tarts according to the packet instructions, & let them cool. WHile they were cooling i made the filling:

~125g Philadelphia spread
~4 tablespoons caster sugar
~3 tablespoons cream (pouring or thickened)
~1 kiwi fruit, peeled & sliced (thick or thin up to you though i find thicker is better)
~Apricot Jam (to glaze)

1. Mix the philly & sugar on low speed. 

2. Add the pouring cream & mix on medium speed until well mixed.

3. Spoon into cooled tart cases.

4. Place kiwi slice on top.

5. Heat up the jam (make sure it is heated properly, i didn't and it was clumpy & ugly boo)

6. Brush over fruit as a glaze
 (not i glazed the whole tart haha friggin hell me + instructions = fail)


I want to try again (i still have kiwi fruits left) but with custard instead, only because i have a major sweet tooth!

Saturday, March 14, 2009

Healthy Lunch


One weekend quite a while ago, decided to make a quick & healthy lunch for Rick & his parents!

Cream cheese & smoked salmon sandwiches (on wholegrain bread, Dad needed the extra fibre), followed by slices of pairs and bite size chunks of strawberries.

Shaheen's Biryani

My work mate Naveed's Wife - Shaheen - makes a KILLER indian Biryani. I actually havent tried it anywhere else before, but they keep telling me you won't find it any nicer is any restaurants in Sydney. (Back in their home India though, there probably is some stiff competition)

Wikipedia says:
Biryani, biriani, beriani is a set of primarily south asian rice based foods made spices, rice (usually basmati) and meat or vegetables. In persian it means 'fried' or 'roasted'.
The spices and condiments used in biryani may include but are not limited to: gheepeasbeanscuminclovescardamomcinnamonbay leavescoriander and mint leaves, gingeronions, and garlic. The premium varieties include saffron. For a non-vegetarian biryani, the main ingredient that accompanies the spices is the meatbeefchickengoatlamb, or shrimp. The dish may be served with dahi chutney or Raitakormacurry, a sour dish of eggplant (brinjal) or a boiled egg.


Every now & again Shaheen will cook this up on a Sunday (the process takes about 2-4 hours, i have yet to come over for a cooking session to learn it). She packs me a container for Monday lunch time and i am forever grateful :) 

Saffron makes the rice the orangey red color that it is, and there are pieces & sticks of clove, cardamom & cinnamon (that i happily chew & swallow, i love all of these flavors in indian cuisine)


It is BEST eaten with onion raita (at restaurants they make it with cucumber instead). Basically it is chopped raw white onions mixed with a bit of plain yogurt. (always chew some gum after eating, or you'll scare everyone away with your onion breathe haha). And for that extra something - add chopped chilli's YUMMY.

I will NEVER get sick of this, despite its high content of fat, having it once or twice a month won't budge my waist measurements!!